Disclaimer: I used AI to help formatting my thoughts™, since my non-native Englando is more consumable this way. Hope you will forgive me.
I've watched teams take six weeks to roll out a test management tool. They form a working group. They run a pilot project. They write a migration plan. Then someone leaves, the plan goes stale, and the spreadsheet wins again.
We built BesTest assuming the opposite: If a tester can't start working in a few minutes, and the basic use cases need an extensive training, the tool is more like a blocker than a helper. We supposed to pick tools to serve us. This post walks through that first 30 mins, compressed.
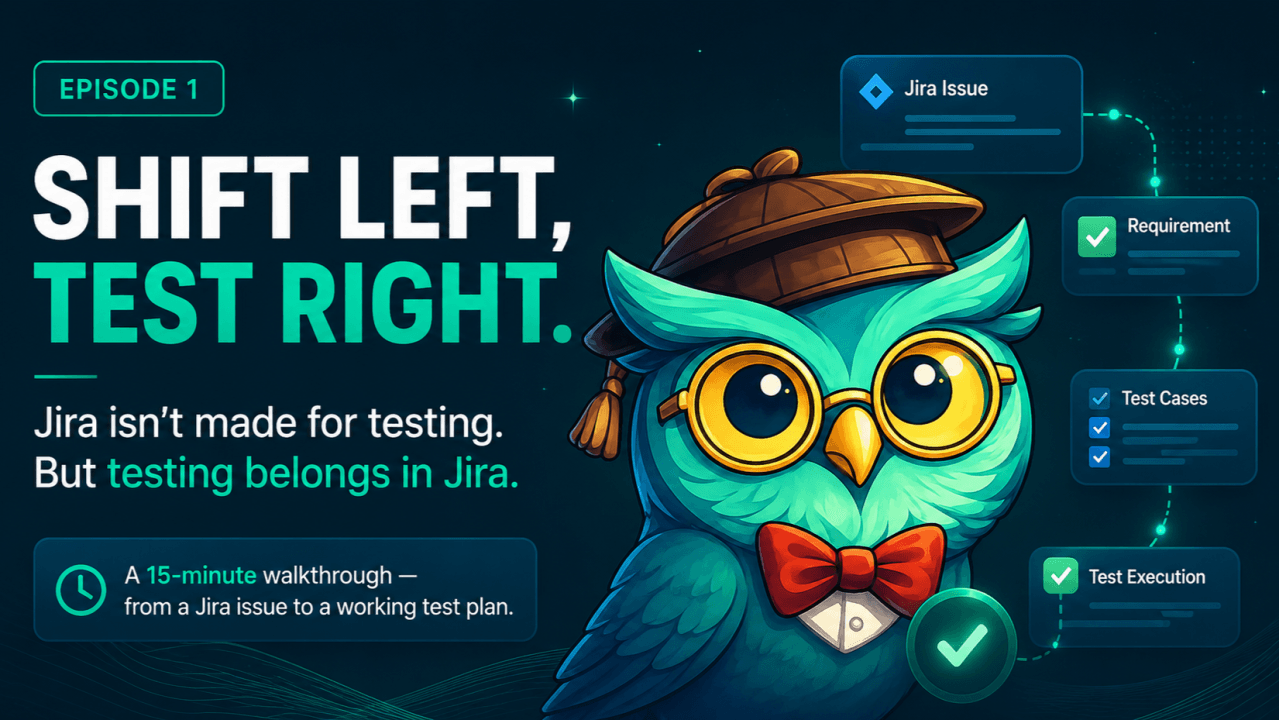
The Testing in Jira anomaly™
Jira work items have a lifecycle: To Do → In Progress → Done. Done means closed - archived, forgotten. That works for tasks. It doesn't work for requirements or test cases, which need to stay alive for years.
You can try to bend Jira into accommodating them - invent a custom status, suppress resolution, build a parallel work item type - but you're working against the grain of the tool, and eventually somebody on the team forgets the rules. But testing supposed to be right next to development. Welcome to the Testing in Jira anomaly™.
So we built BesTest (the wannabe Best Test Management app for Jira - looking at Atlassian to make us a rising star) with its own data model. Requirements and test cases live separately from the work items they relate to. The relationships are first-class. The lifecycle is the right shape. None of this means leaving Jira - a panel sits on every Jira work item, testing assets lives in Jira, the gadgets sit on Jira dashboards, defects are real Jira work items. It just means the things that need to last for years aren't stored as things designed to be closed and forgotten.
The walkthrough below is the path I'd take if I were starting a new project tomorrow.
0. Install and turn it on
Install BesTest from the Atlassian Marketplace. Free for up to 10 users; above that, the standard Atlassian per-user pricing tiers - there's a calculator on the listing.
If you want to try it without touching production Jira, spin up an Atlassian sandbox site - it takes a few minutes.
On any project where you want to use BesTest, an admin clicks one button on the project settings page: Enable BesTest. There's no separate permission system to configure - if someone can browse the project, they can use BesTest in it.
You can always open BesTest from the App menu or the project menu, and select a project to get started.
On the Jira work item, the BesTest panel doesn't appear by default. Each user clicks Show panel once. It's a Forge platform behaviour - we can't change it. After that first click it stays.
Three minutes of setup, total. You now have a 30-day trial running and a project ready to use.
1. Start where the work already is
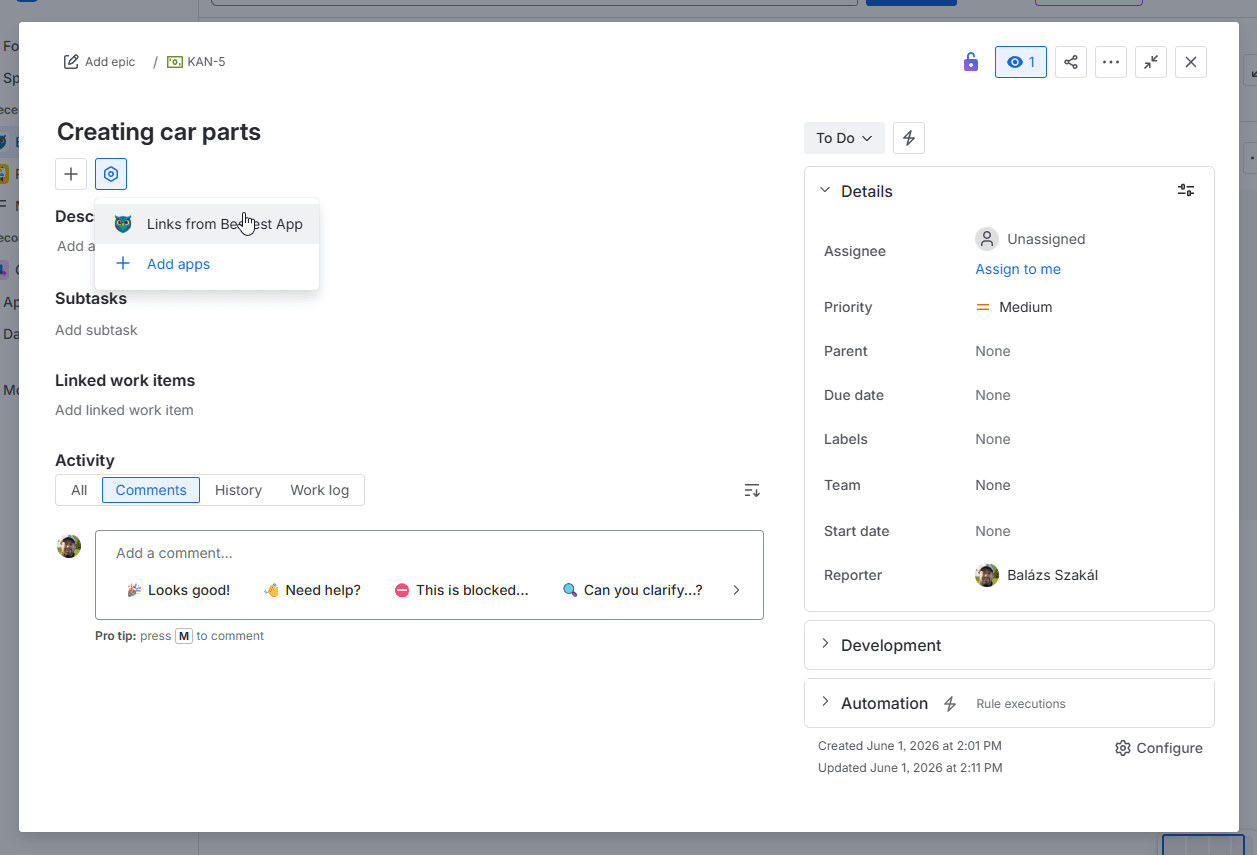
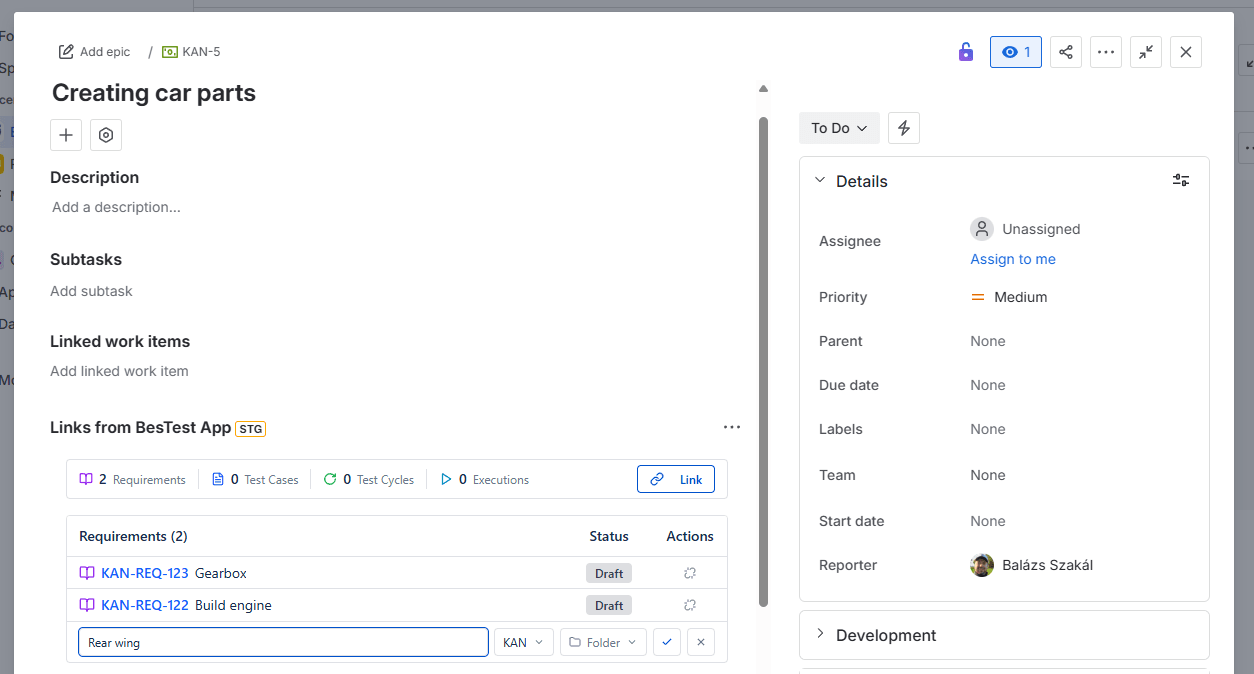
Open any Jira work item - a story, an epic, a task. The BesTest panel is right under subtasks.
The reason this matters: most test management tools ask you to leave the work you were doing, open a different app, find the right place in the tree, then come back. That sounds like a minor cost. It isn't. The reason testing falls behind in most teams is that it lives in a different tab. Out of sight, out of sprint.
A customer told us once that he couldn't find a way to create requirements directly from a Jira work item - he was navigating to BesTest, creating one, then navigating back to link it. That single piece of friction is what convinced us to build the next step.
2. Create a requirement without leaving the work item
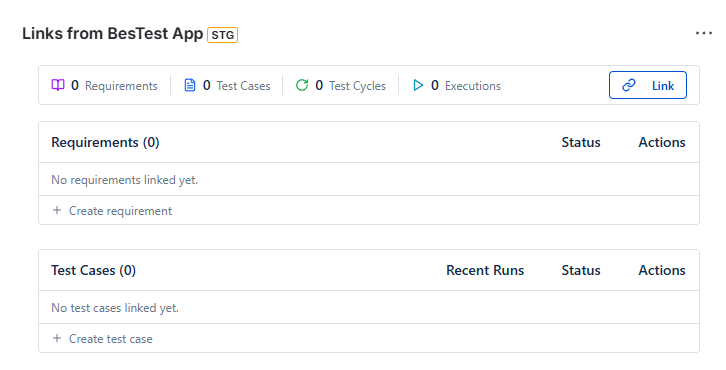
In the BesTest panel, hit + on the Requirements row. Pick the project, pick a folder, type a name. Enter.
That's the whole interaction. The requirement is created, stored under the right folder, and linked to the Jira work item you were reading.
This is the right tool for a planning session. A PM, a developer and a tester sit together, look at a Jira story, and turn its prose into a list of bullet points everyone can agree on - the "three amigos" practice. (Three amigos: the agile habit of getting product, development and QA in the room together to align on a story before code is written. See ISTQB on shift-left testing - testing as early in the lifecycle as possible - for why this matters.)
What used to suck: those agreements lived in the comments of the Jira story, or in a Confluence page someone wrote and nobody read. Now they live as structured requirements with a status, a folder, and - about to matter - a coverage relationship.
You can do this across multiple projects from the same Jira work item. If dev work is in project A but the test plan lives in project B, the inline-create row lets you pick the destination.
Cross-project requirement-gathering, one work item, one session.
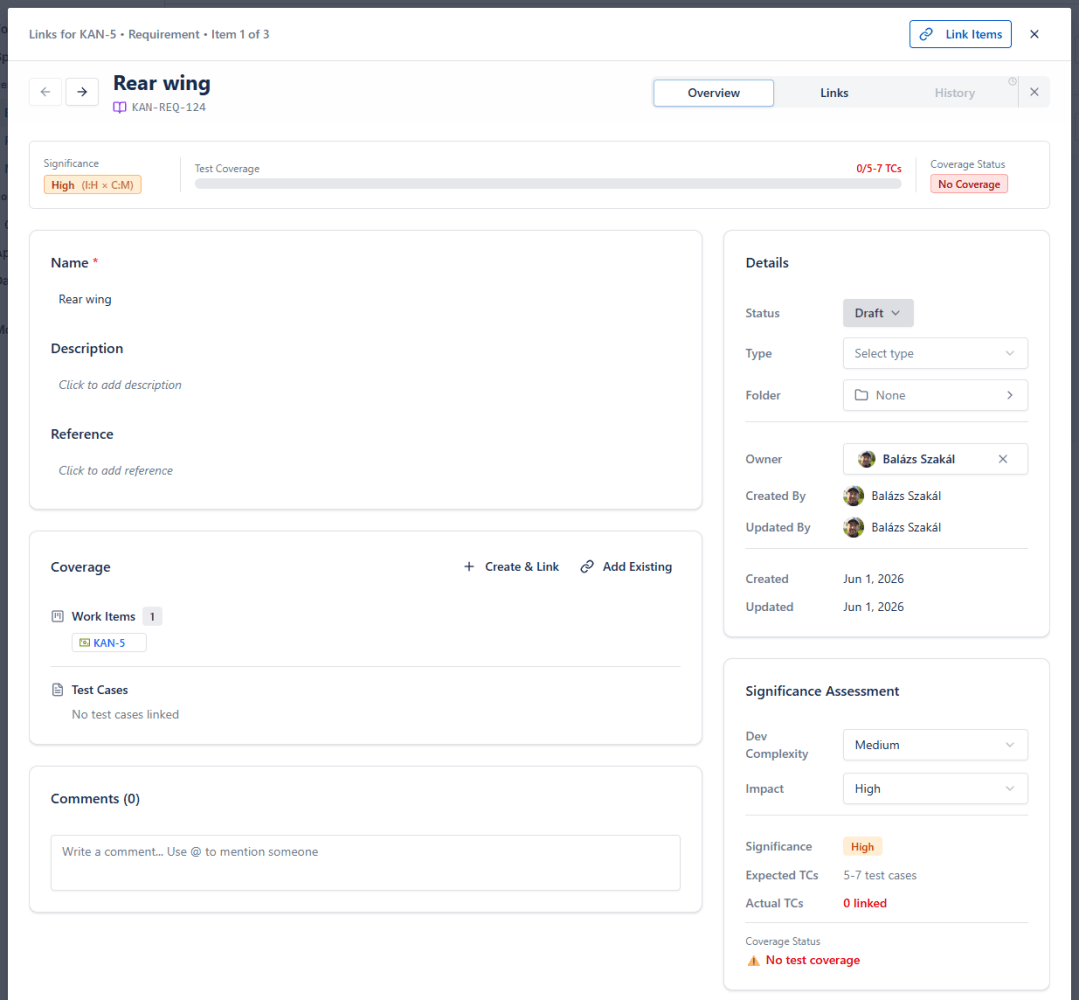
3. Give the requirement a shape
Open the requirement. Set two fields:
- •Complexity - how hard is this to build? Low / Medium / High.
- •Impact - how badly does it matter to a release? Low / Medium / High.
Significance is calculated automatically from the two - Low / Medium / High / Critical. You don't compute anything. You answer two questions and the app works for you.
Significance is the field that drives the rest of the tool. Later, when you have fifty requirements in a folder, it's what tells you which to focus on. BesTest also uses it to suggest a minimum number of test cases per requirement - the system helps you hinting when a critical requirement is undercovered.
Requirements in BesTest don't have version history yet. If you update one, it's updated. Version control is on the roadmap. For now, we focus on the main flow - agreement, not archaeology.
4. Create test cases from the requirement itself
This is the moment I want to spend longer on.
Open the requirement. Hit Create & Link for this requirement. A modal opens - type five test case names, one per line. Submit.
five test cases are created. They're already linked as coverage to the requirement. You don't go anywhere else. You don't open the test case afterwards to link it back. The link existed before the test case had any details on it.
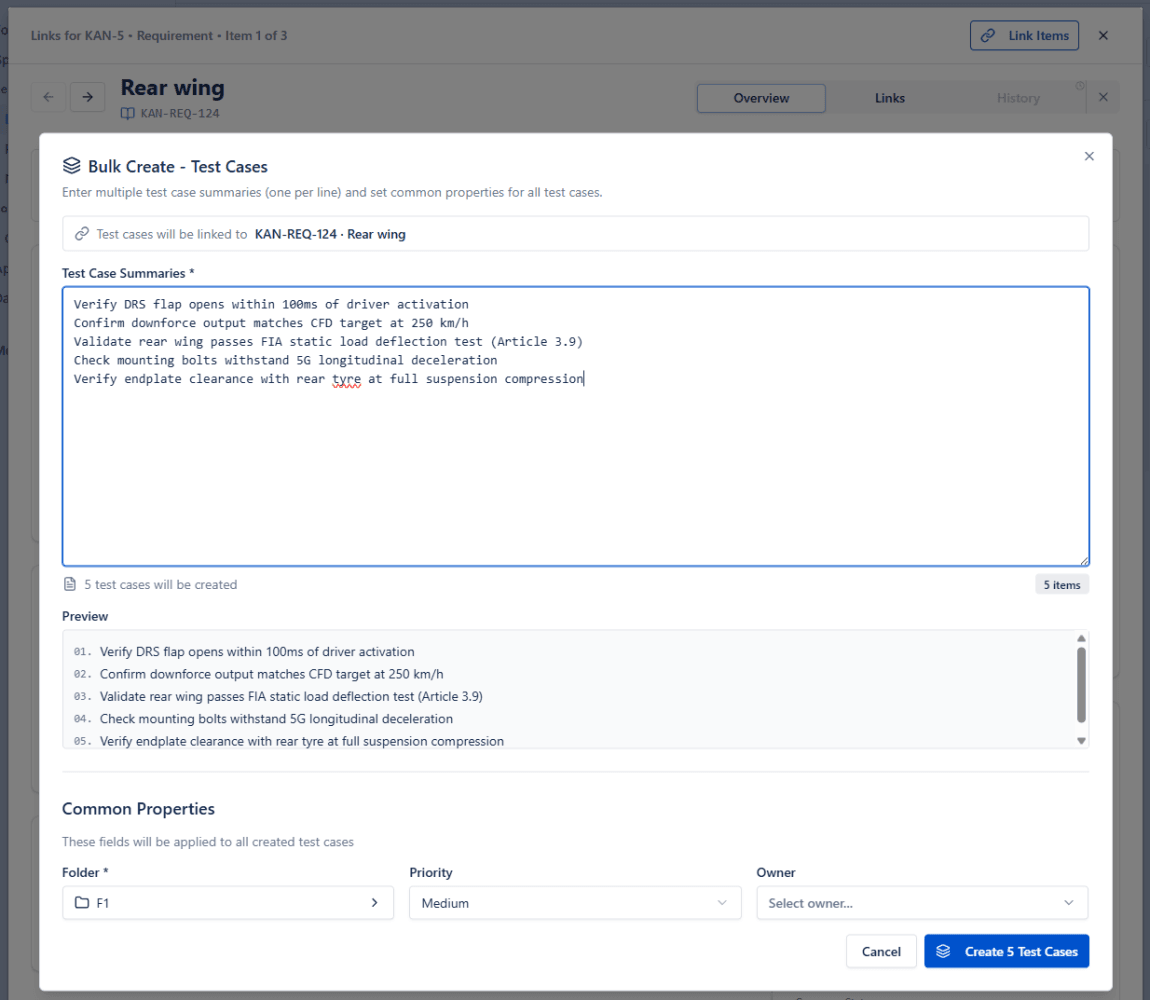
When we shipped this, it changed how we work internally. Before, creating coverage was: create a test case, navigate to the requirement, find the link section, search for the test case by name/folder, click Add link, save. For ten test cases, that's an exercise in patience. After, it's one modal.
We also added a column to the requirement catalogue called Test Results. For each requirement, it shows whether any test cases cover it, and what the latest execution result was. The first time we looked at our own catalogue with that column turned on, several rows were red and a couple were empty. We hadn't realised. The column made it visible. That's what a test management tool is for - making visible the things you'd lost track of.
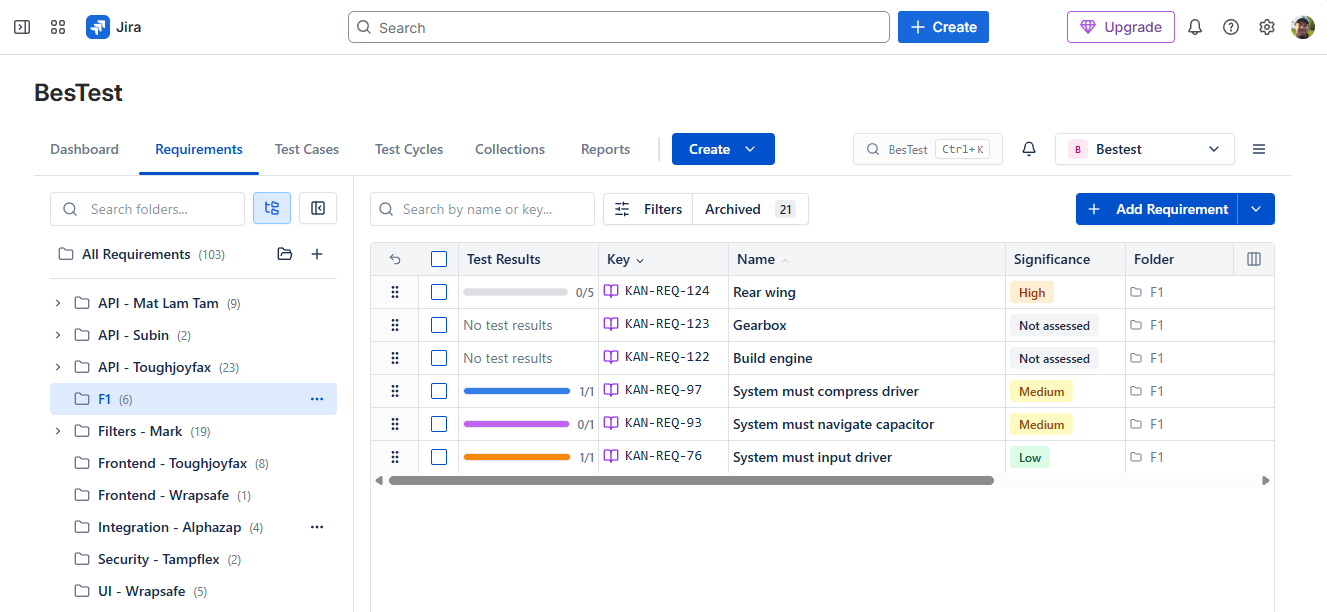
You can also page through requirements with the left and right arrows, checking coverage one at a time. For a backlog of fifty new requirements, the loop is: open requirement → bulk-create three or four tests → arrow right → repeat. Roughly thirty seconds per requirement, and no focus loss.
Try the 15-Minute Walkthrough Yourself
Install BesTest from the Atlassian Marketplace, enable it on a project, and go from a Jira work item to a working test plan in minutes. Free for up to 10 users - no migration, no rollout project.
Try BesTest Free5. Fill in the steps later, not now
You have test cases linked to requirements. They have names. That's enough to ship the catalogue.
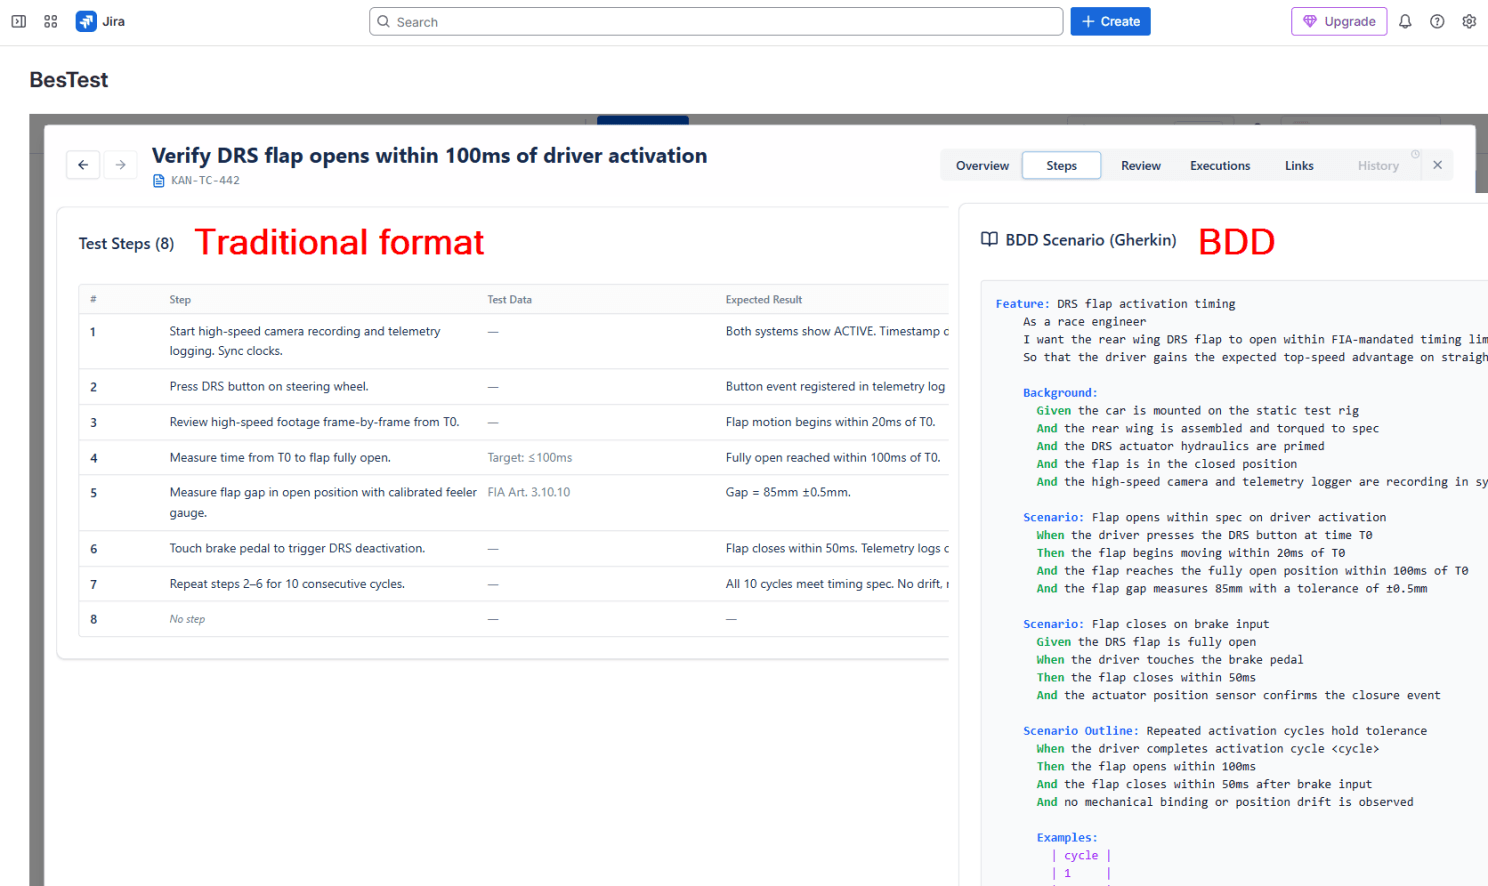
Open any test case and add detail when you're ready. Test cases in BesTest are just notes to your future self. The most important thing about a test case is that it exists and has a name that tells you what to check. Everything else - steps, expected results, preconditions, tags - is for the day six months from now when you've forgotten the context.
Two formats are supported: traditional step-by-step (action, input data, expected result - the format that scales when testers don't know the application deeply) and BDD / Gherkin. Pick what your team uses.
6. Group what you're going to test - and not by test case
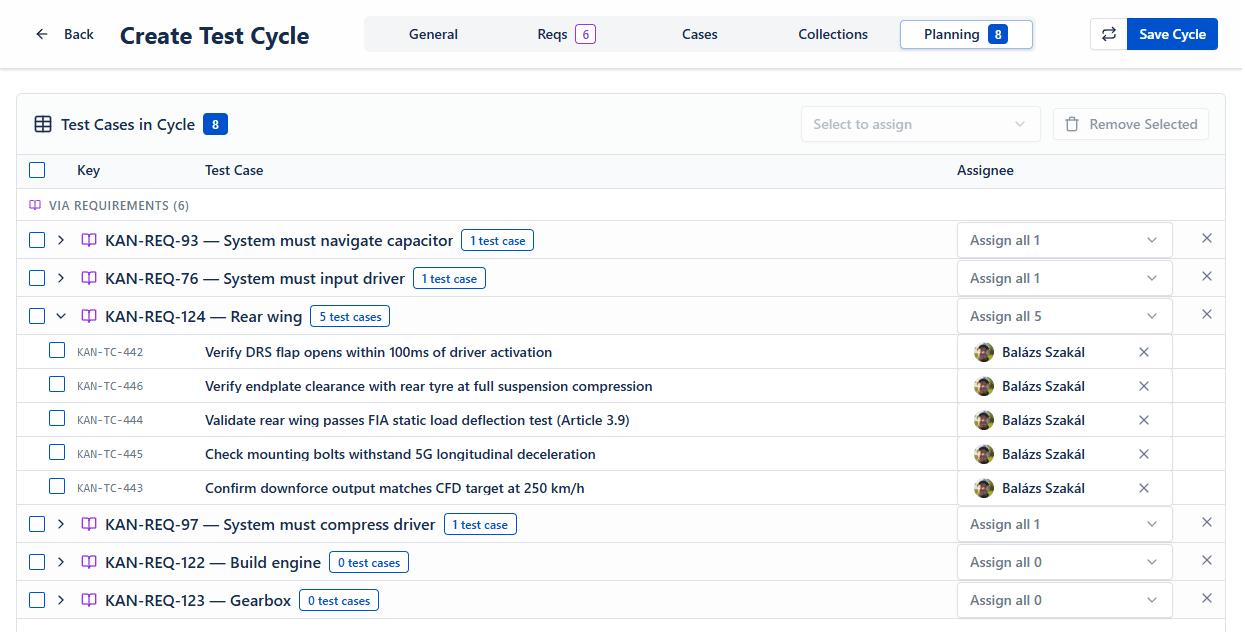
Create a test cycle. Give it a name like "2026 - New Atlassian Williams F1 Team parts for Monaco".
A cycle is the planned set of executions for a release, a sprint, or whatever testable unit your team works in. Most tools ask you to add test cases to it. In BesTest you can do that - but here's the better way:
When you create a cycle, you can add requirements directly. Every test case linked as coverage to those requirements is added automatically.
We added this because we kept catching ourselves asking the wrong question. We'd open a cycle and ask "which test cases should we run?" The right question was "which requirements are we trying to verify in this release?" Pick the requirements. The test cases follow (there are test collections also worth mentioning for scaling teams, will cover that in a later article). A cycle is not a folder. It's a one-time, time-boxed plan. Once it's done, it's done - the executions inside it become history you can report on.
7. Actually run it
Open the cycle. Open the Test Player.
This is where most tools quietly fall apart. The execution interface in the average test management tool feels like a modal trapped inside an admin screen. Ours is full-screen - test cases on the left, steps on the right, status colours per step (passed, failed, blocked, skipped), an overall status per execution. Sort and group by status, assignee, folder, or source requirement.
Think of it as the spreadsheet you used to colour cells in - except every cell links to a requirement that links back to the Jira work item that started this whole thing. Mid-execution, if a test feels ambiguous, you can jump from the step to the requirement to the originating Jira item in two clicks. Read the original intent. Decide whether the behaviour matches.
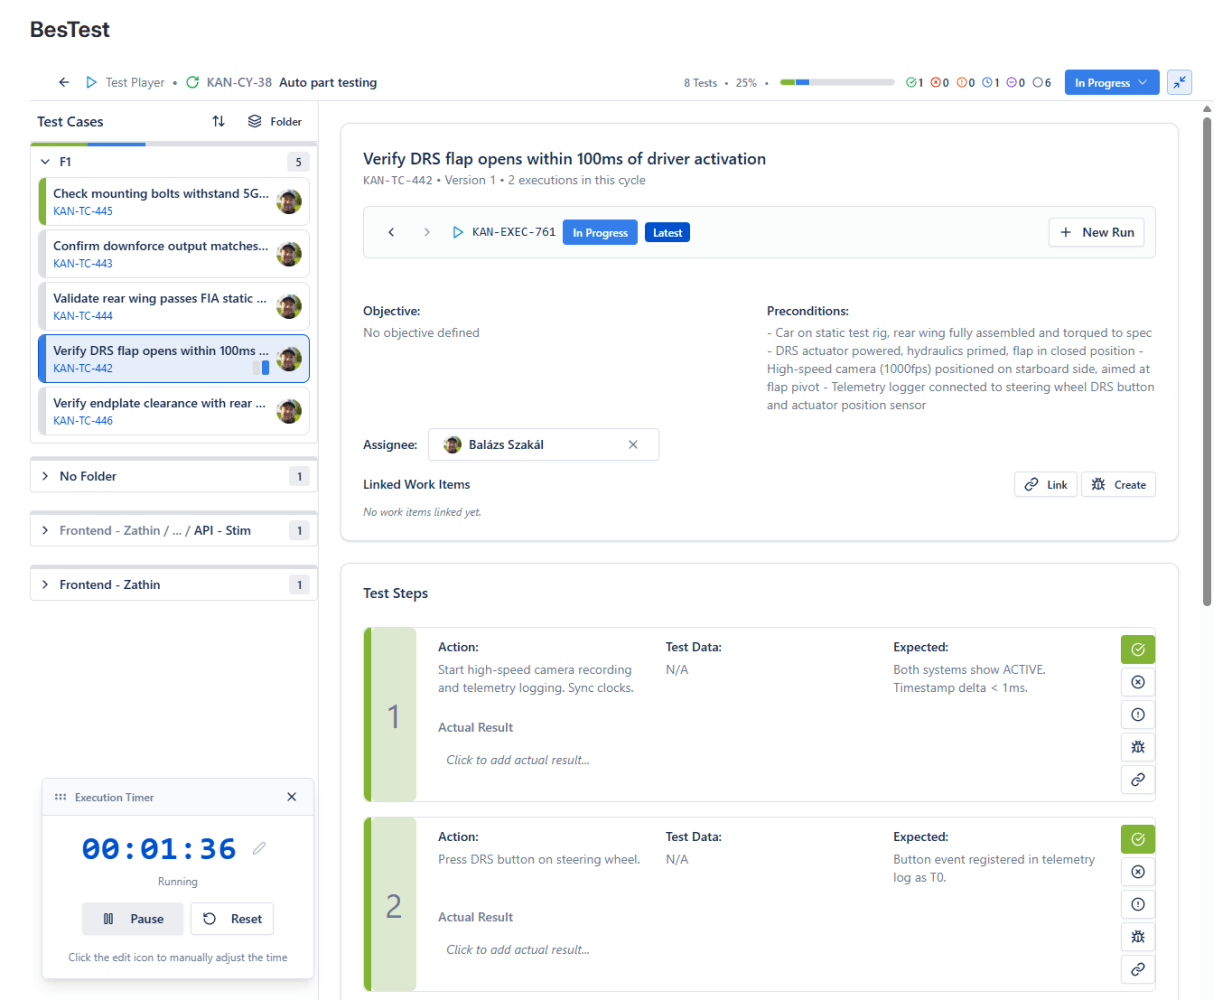
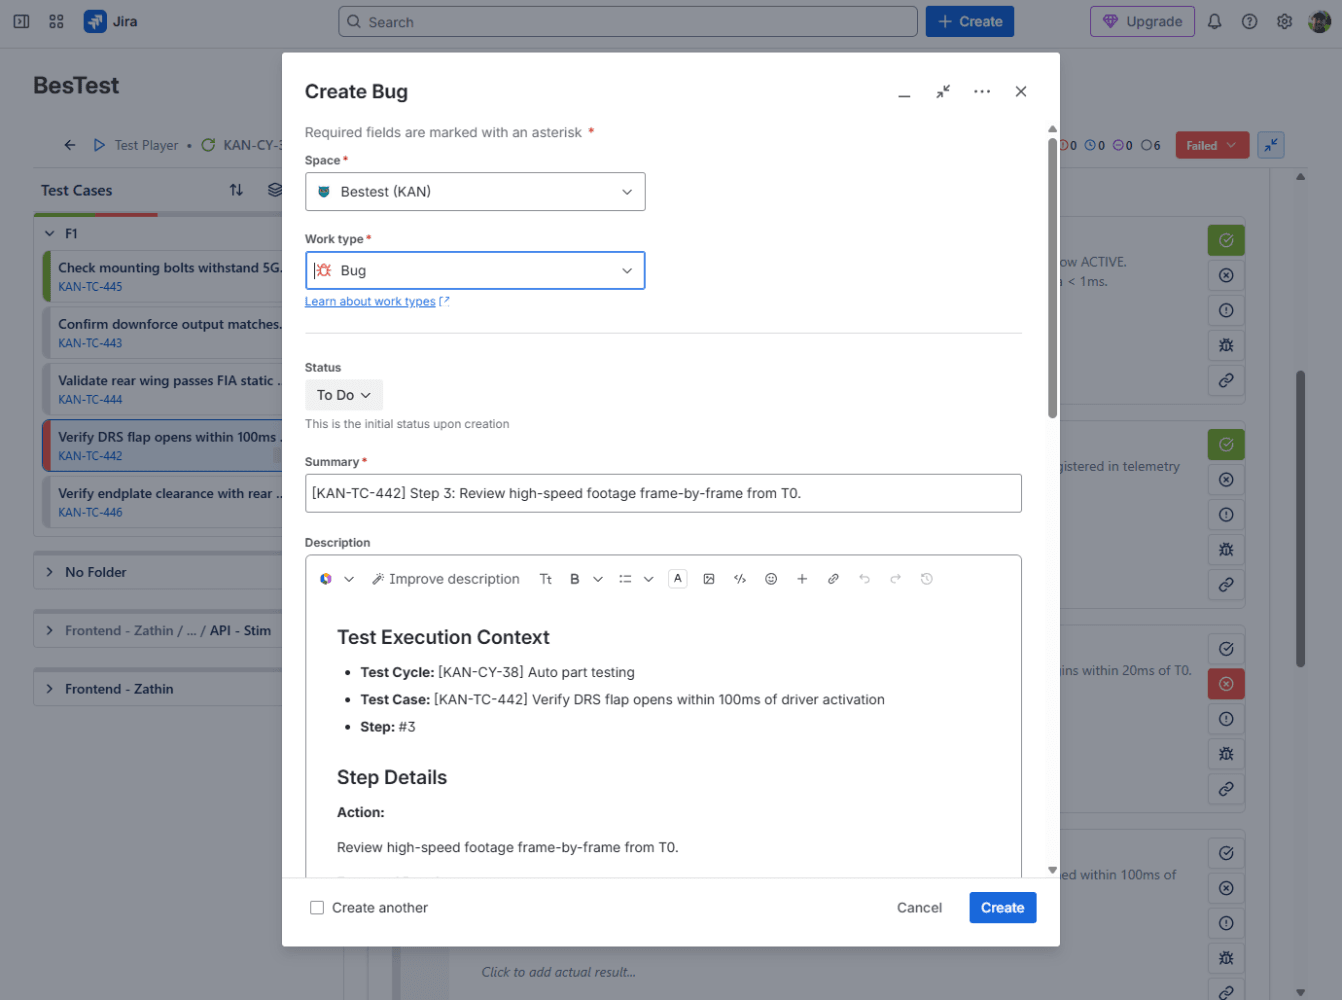
When something fails, hit Create defect. What opens is Jira's actual native Create modal, pre-filled with the summary, the failed step and a link back to the execution. Optionally add one sentence about what you saw. Hit Create. The defect is already linked to the execution and visible in the built-in reports.
The first time I created a bug through this flow during a real execution, I caught myself with nothing to type. The context I would normally write out by hand was already filled in. That's the feeling we were going for.
8. See where you stand
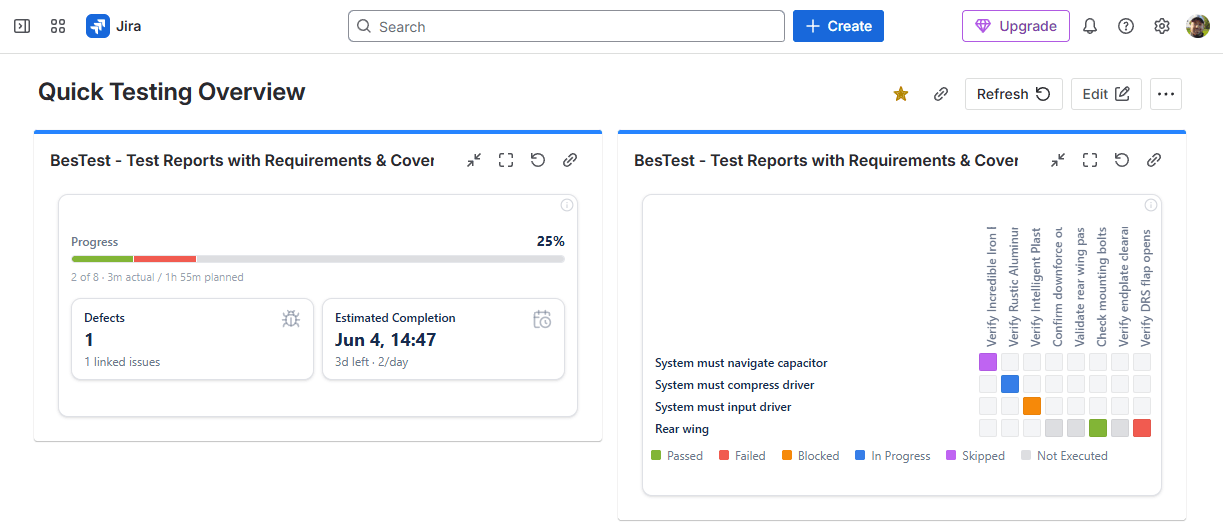
Open a Jira dashboard. Add BesTest gadget twice:
- •Choose Execution Overview - how far through the current cycle the team is, with a projection of when it'll finish at the current pace.
- •Choose Requirements Coverage Heatmap - every requirement in scope, coloured by latest execution result.
That's it. No new app to open. No separate reporting tool. It's a Jira dashboard, with Jira's auto-refresh, sitting next to whatever sprint burndown the PM already looks at.
You can do more - chose from 20 gadgets with cross-project report ability and 5 extensive, hand made report. But you don't need any of that today. Two gadgets are the minimum viable dashboard.
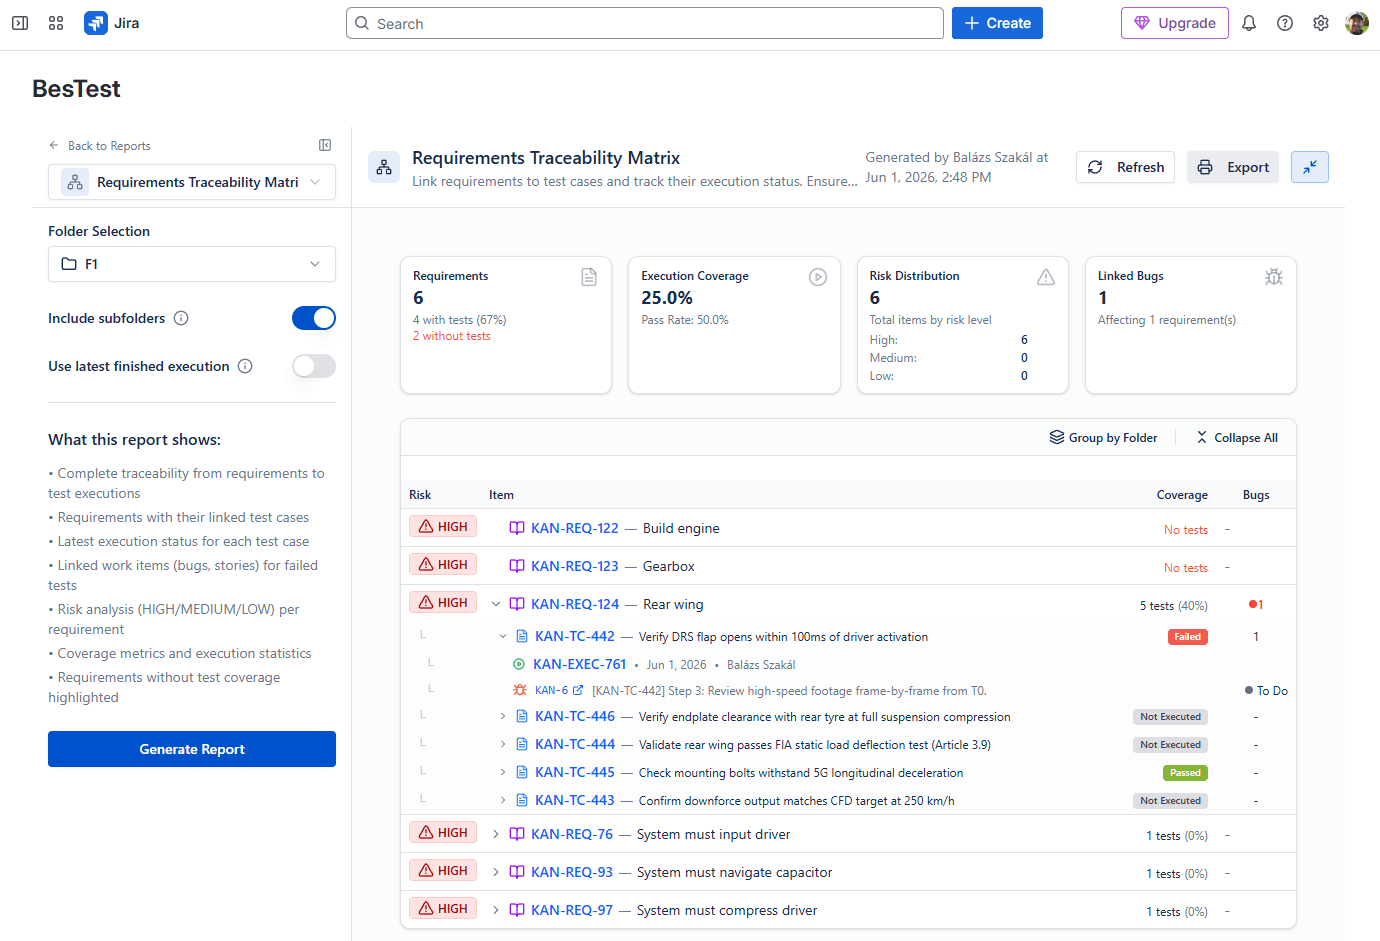
9. Generate the report
This is the artefact: every requirement, the test cases covering it, the latest execution result, the linked defects. One page.
This is the report that makes the cycle real to people who weren't in it. The PM reading it doesn't need to know about test cases or coverage links - they need to know whether the features they signed off on actually work. The matrix is that answer.
10. What this took, and what it didn't
If you add up the actions:
- •Enable, open the panel, create requirements from a work item: ~2 minutes
- •Create connected, meaningful test cases (3-5 requirements, 5-10 test cases): 3-5 minutes
- •Set up a cycle, run a few executions, drop two gadgets on a dashboard: 5 minutes
Under 15 minutes, you can be at three to five requirements, five to ten test cases, a few executions, and a dashboard showing all of it. That's not the polished test suite of a team that's been doing this for two years. It's the starting position. The point is that you can get to the starting position in one sitting.
What I deliberately skipped, all of which lands in later episodes:
- •Smart collections - rule-based test sets that pull in matching cases automatically.
- •Peer review workflows - getting a teammate to review your test cases before they go live.
- •Campaigns - grouping multiple cycles together for reporting
- •The other eighteen gadgets and the other four report types.
- •Collaborating with the In-app notification system
- •What's still on the roadmap - version history for requirements, deeper integrations with automation and CI, MCP / agentic support.
I'm going to keep these posts direct. Some episodes will cover things we're proud of. Some will cover things we're still figuring out. The reason we're writing them - and the reason we're writing them ourselves, not handing them to an agency - is that there's a version of test management that small and mid-size teams have been priced out of, or scared off by, for too long.
BesTest is our attempt at the version that doesn't require a six-week rollout or a budget conversation.
If something in this walkthrough didn't match your experience, please tell me.
Otherwise, why wouldn't you try BesTest for free, today from the Atlassian Marketplace?
Episode 2 lands next month - I have a few ideas about what's next, but maybe your reactions will steer it in a different direction. We'll see!
Frequently Asked Questions
How do you do test management in Jira?
Install a test management app such as BesTest from the Atlassian Marketplace, enable it on a project, then create requirements and test cases inline on your existing Jira work items. You link test cases to requirements as coverage, group them into a test cycle, run executions in a full-screen Test Player, and log failures as native Jira defects - all without leaving Jira. BesTest reaches a working, traceable test plan in under 15 minutes.
Why isn't Jira alone good enough for test management?
Jira work items follow a To Do, In Progress, Done lifecycle, and Done means closed and archived. Requirements and test cases need to stay alive for years, so forcing them into Jira's work-item lifecycle works against the grain of the tool. A dedicated data model keeps requirements and test cases first-class, while a panel on the work item, dashboard gadgets, and real Jira defects keep everything wired into Jira.
Can I link test cases to requirements in Jira?
Yes. In BesTest, requirements and test cases are linked as first-class coverage relationships. You can bulk-create several test cases straight from a requirement with Create and Link, and each test case is linked the moment it is created - no manual back-linking step.
Do I really not need to migrate anything to get started?
Correct. You install BesTest from the Atlassian Marketplace, enable it on a project, and create requirements and test cases inline on your existing Jira work items. There is no data migration step required to reach a working test plan - the walkthrough in this article starts from a clean project and reaches a baseline in under 15 minutes.
If requirements and test cases live in BesTest, is testing still connected to Jira?
Yes. Requirements and test cases have their own data model and lifecycle in BesTest, but they stay wired into Jira: a panel sits on every Jira work item, the gadgets sit on Jira dashboards, and defects are real Jira work items. Testing stays right next to development; it just is not stored as Jira work items, which are designed to be closed and forgotten.
What does requirement "significance" do?
You set two fields on a requirement, Complexity and Impact, and BesTest calculates Significance automatically as Low, Medium, High or Critical. Significance tells you which requirements to focus on and suggests a minimum number of test cases per requirement, so the tool can hint when a critical requirement is undercovered.
Is "Shift Left, Test Right" a one-off or an ongoing series?
It is an ongoing series with a new chapter every month. This is Chapter 1. Future chapters cover smart collections, peer review workflows, campaigns, the other gadgets and report types, and roadmap features such as requirement version history and CI/automation integration as they ship.
Try the 15-Minute Walkthrough Yourself
Install BesTest from the Atlassian Marketplace, enable it on a project, and go from a Jira work item to a working test plan in minutes. Free for up to 10 users - no migration, no rollout project.
Try BesTest Free
Balázs Szakál
Founder & QA Lead at BesTest
Founder of BesTest and QA professional with extensive experience in software testing, test management, and Jira administration. Built BesTest to give testing teams complete visibility from requirements to release.
More about the team →