
What Is a Test Cycle and Why It Matters
A test cycle is a planned, organized execution of a specific set of test cases. Think of it as a "testing sprint" - a defined period where your team runs a group of tests, records the results, and reports on the outcome.
You could execute test cases one by one, whenever you feel like it. But without cycles you lose:
- •Context: When was this test last run? Was it part of the Sprint 5 release or the hotfix?
- •Progress tracking: How far along is testing? When will we be done?
- •Comparison: Did quality improve between releases?
- •Accountability: Who was supposed to test what, and did they finish?
Test cycles solve all of these by grouping executions into a named, time-bound batch with assigned testers and trackable progress.
What You'll Build in This Tutorial
This is a hands-on walkthrough. You'll open BesTest in your Space, create a cycle, fill it with test cases (manually or from a Smart Collection), assign testers, execute the tests in the Test Player, log a defect from a failure, and read the results. By the end you'll have a complete, reported test cycle - and a repeatable process for every cycle after it.
Before You Start: A 5-Minute Plan
You don't need a test plan document to run a cycle, but five minutes of thinking saves hours of confusion. Answer three questions before you click "New Test Cycle."
What is this cycle for?
Be specific about scope:
- •Bad scope: "Test everything"
- •Good scope: "Verify all new features from Sprint 7 and regression-test the checkout flow"
The cycle type usually answers this for you:
| Type | Purpose | When to Use |
|---|---|---|
| Sprint Test Cycle | Test new features from the current sprint | End of each sprint |
| Regression Cycle | Verify existing features still work | Before every release |
| Smoke Test Cycle | Quick check that critical paths work | After every deployment |
| UAT Cycle | Business stakeholder acceptance testing | Before production release |
| Hotfix Verification | Verify a specific bug fix | After hotfix deployment |
In BesTest, all of these follow the same workflow - the difference is which test cases you include and who executes them. This tutorial uses a sprint test cycle as the example.
Which test cases - and roughly how many?
Your scope tells you what to pull in: test cases for the sprint's new stories, regression tests for affected areas, and re-verification tests for fixed bugs. If you've set up Smart Collections, this step is one click - you'll see how in the "adding test cases" section below.
To sanity-check the timeline, estimate 5-15 minutes per manual test. For example: 50 test cases at 10 minutes each is 500 minutes; two testers with 3 hours a day each cover that in about 1.5 days, plus buffer for defect triage and re-testing.
Who tests?
Decide who executes what. Assign domain-specific tests to the testers who know that area, balance the load, and for important cycles assign tests to someone who didn't build the feature.
Finally, confirm the environment is ready: the right build is deployed, test data is loaded, and testers have access credentials. That's the whole plan - now let's build the cycle.
Step 1: Create the Test Cycle
Open BesTest and create the cycle - this takes about two minutes.
- 1Navigate to your Jira Space and click "BesTest" in the Space menu bar at the top
- 2Go to the "Test Cycles" section
- 3Click the "New Test Cycle" button
- 4Fill in the General tab:
| Field | What to Enter | Example |
|---|---|---|
| Name | A clear, descriptive name | Sprint 7 - Payment Module Tests |
| Description | Scope and objectives | Verify new payment gateway integration and regression-test existing checkout flow |
| Planned Start | When testing begins | 2026-06-10 |
| Planned End | Target completion date | 2026-06-14 |
| Assignee | Who owns the cycle | Your QA lead |
| Status | Draft while you plan, or Ready to Execute if testers can start right away | Draft |
Don't click "Save Test Cycle" yet - the other tabs let you add test cases and assign testers first, which is what we'll do next. (You can also save an empty cycle and add test cases later.)
Naming Conventions That Scale
As you create more cycles, good naming becomes important. Patterns that work well:
- •Sprint cycles:
Sprint [#] - [Module/Feature] Tests - •Regression cycles:
Regression - Release [version] - [date] - •UAT cycles:
UAT - Release [version] - [stakeholder group] - •Hotfix cycles:
Hotfix - [JIRA-ID] - [brief description]
Consistent naming makes it easy to find historical cycles and compare results across releases.
Multiple Active Cycles
BesTest supports having multiple test cycles running at the same time - a sprint cycle for the QA team, a UAT cycle for business stakeholders, and a regression cycle can all run in parallel. Each cycle operates independently, and the same test case can be included in multiple cycles, each with its own execution record.
Step 2: Add Test Cases - by Search or Smart Collection
Still in the create flow, you fill the cycle from three tabs. Use any mix of them - the Planning tab shows the result, and a test case that comes from several sources is added only once (directly added first, then via requirements, then via collections).
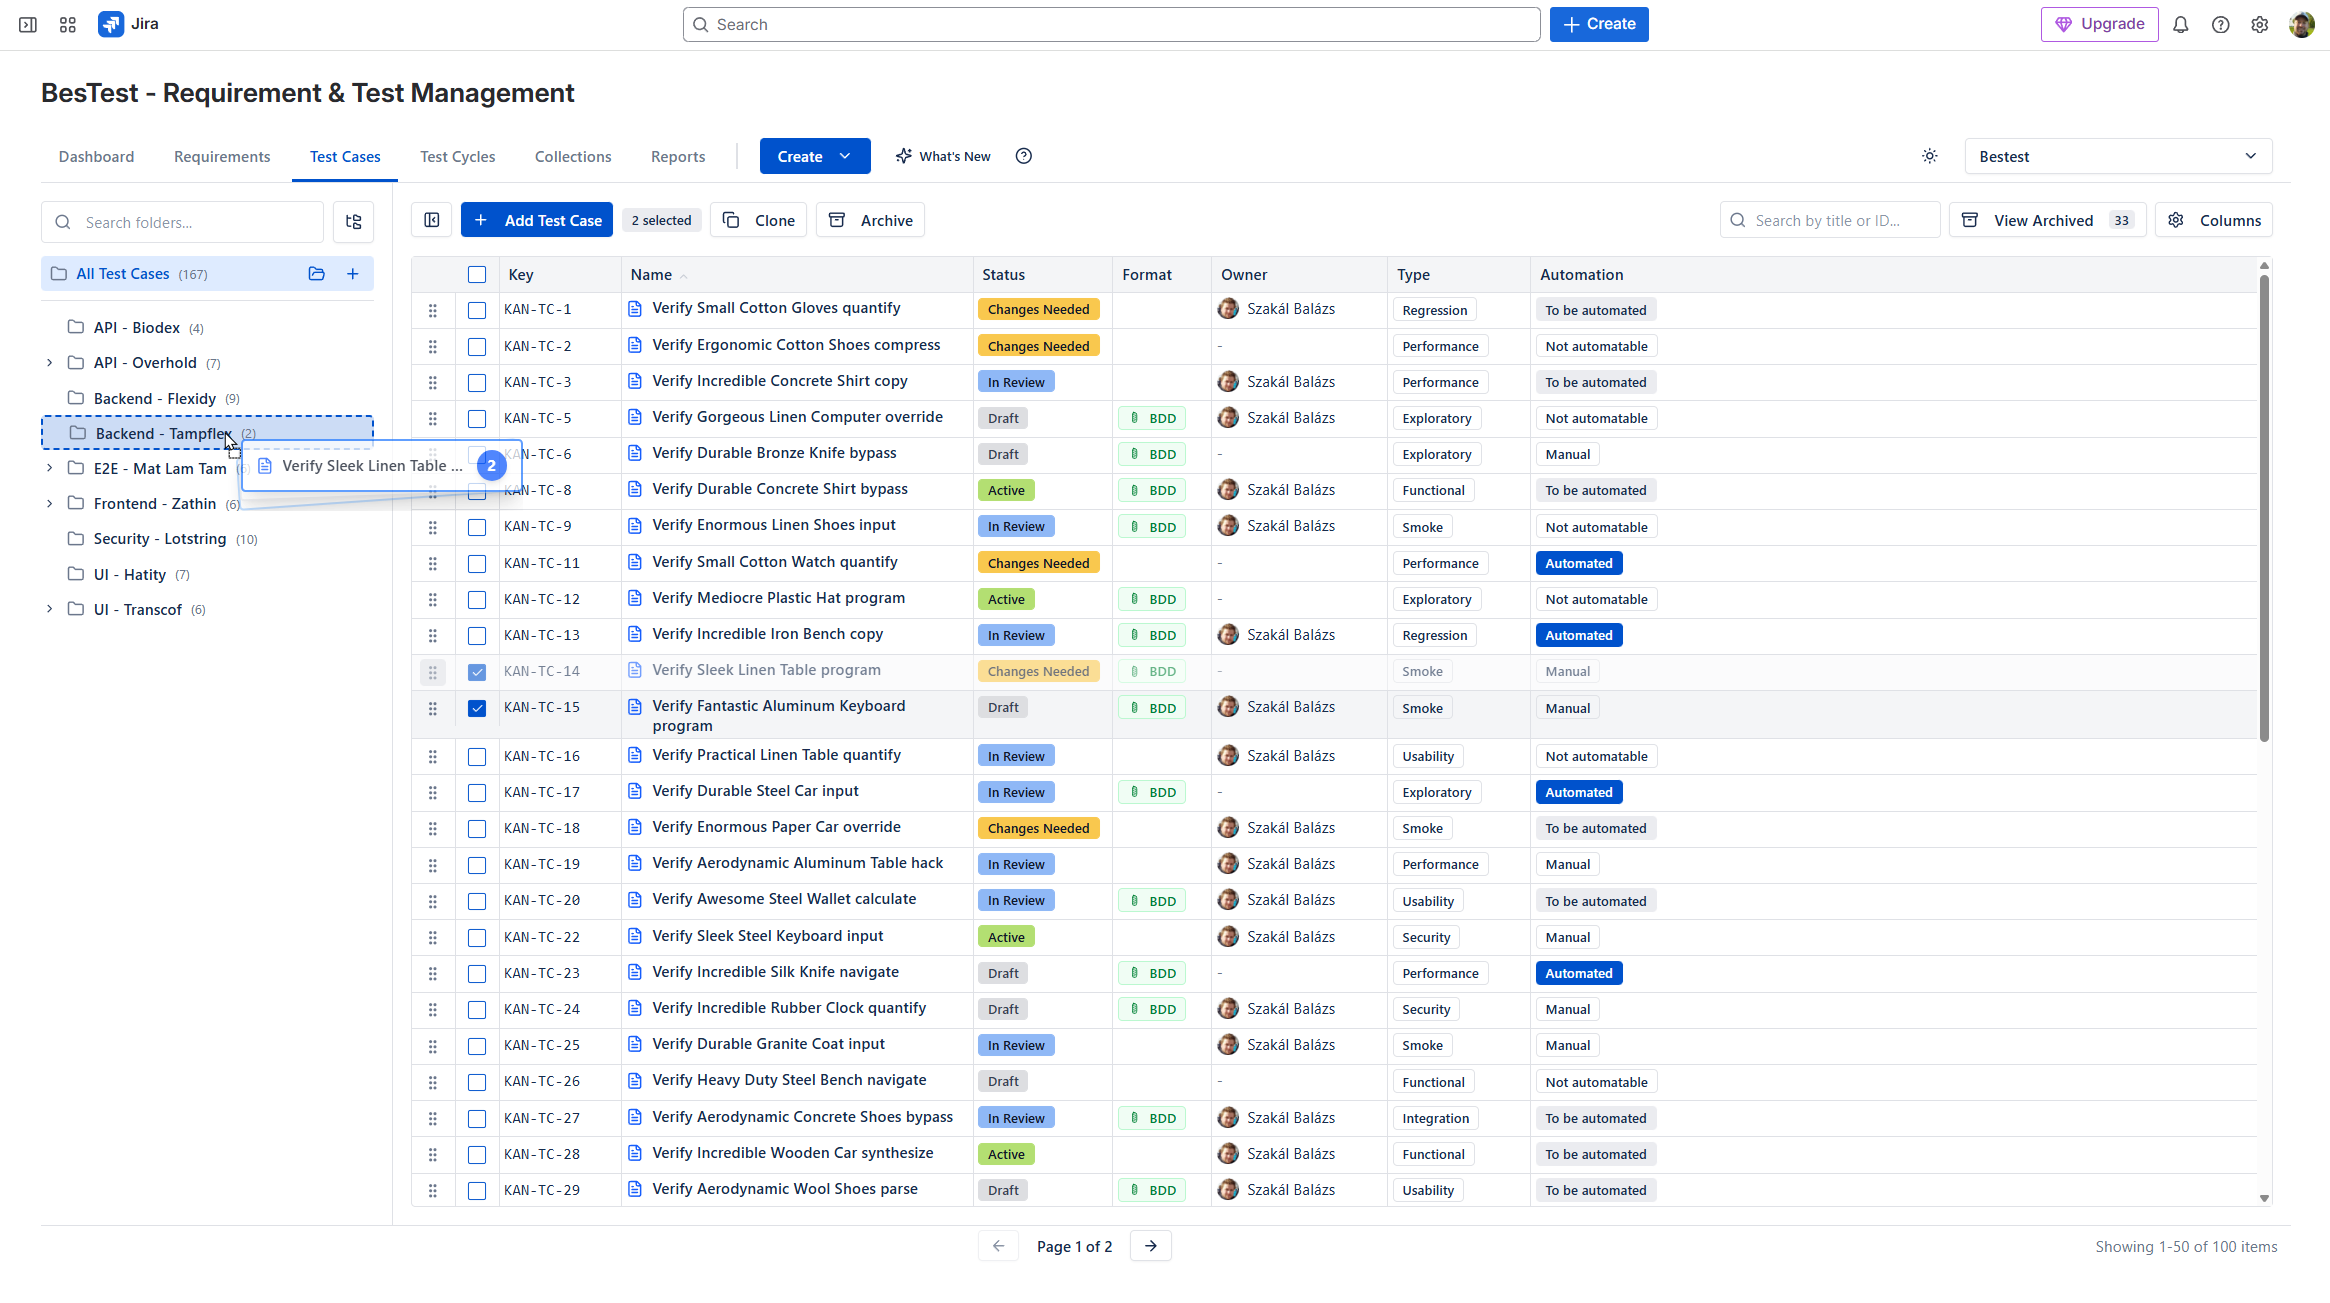
Option A: Test Cases tab
- 1Browse the folders, search, or use Filters (for example priority High and Critical)
- 2Check the test cases you want and click "Add Selected"
Option B: Requirements tab
Select the requirements you want to test and click "Add Selected" - their linked test cases are added. Handy when you test a release by scope rather than by test case. Make sure the requirements are Covered first, so the cycle gets enough tests.
Option C: Collections tab
If you've set up Smart Collections (reusable sets like "Regression Suite"), select one or more and click "Add Selected". Populating a 100-test regression cycle takes seconds. See the Smart Collections tutorial for setup.
How Many Test Cases?
| Cycle Type | Typical Size | Rationale |
|---|---|---|
| Smoke test | 10-20 tests | Critical paths only, quick validation |
| Sprint cycle | 20-50 tests | New features + related regression |
| Full regression | 50-200+ tests | Comprehensive coverage before release |
| UAT cycle | 20-80 tests | Business-critical workflows |
Before moving on, review the list: do all new features have coverage, are regression tests included for impacted areas, and is the total realistic for your timeline?
A focused, achievable cycle beats an ambitious one that never finishes. If you have too many tests, split them into "Must test" (Cycle A) and "Should test" (Cycle B). Run Cycle A first, then Cycle B if time permits.
Step 3: Assign Testers and Save
With the test cases in place, assign them on the Planning tab - still in the create flow (you can also do this any time later on the cycle's Planning tab).
- 1Pick a tester in the Assignee column of a test case (a collection's default assignee is already filled in)
- 2For many at once, check several test cases and use the "Assign N selected" picker above the list
- 3Click "Save Test Cycle" to create the cycle
Bulk assignment makes even distribution easy: select the first third and assign to Tester A, the next third to Tester B, and so on.
Quick Assignment Strategies
- •By module: the tester who knows the area best tests it (better depth, but creates silos)
- •Round-robin: even workload and cross-training, at the cost of familiarity
- •By priority: critical tests go to your most experienced testers
- •By test type: functional tests to QA, UAT tests to business users
Most teams combine these - by module for feature tests, round-robin for regression.
Notifications Do the Announcing
BesTest's in-app notifications alert testers when the cycle is set to Ready to Execute and they have test cases assigned in it, so nobody needs to check for new work. Still, tell the team the essentials: the start and end dates, which tests to run first if time is limited, and who to contact when blocked. This matters most for UAT cycles, where business users aren't in BesTest every day.
After assigning, review the distribution - make sure no single tester is overloaded while others have capacity. For large cycles, consider staggering: assign the first batch immediately and the second once the first is underway.
The cycle is now created, populated, and assigned. Next up: execution.
Live preview - this is the real BesTest UI
Step 4: Execute Tests with the Test Player
This is where the actual testing happens. BesTest's Test Player is a focused, step-by-step execution screen.
Opening the Test Player
Results are recorded only when the cycle is Ready to Execute (or In Progress) - while it is Draft, execution is blocked, giving you time to finalize the setup.
- 1Open your test cycle and, if it is still Draft, change its status to "Ready to Execute"
- 2Click "Test Player" on the cycle's Overview
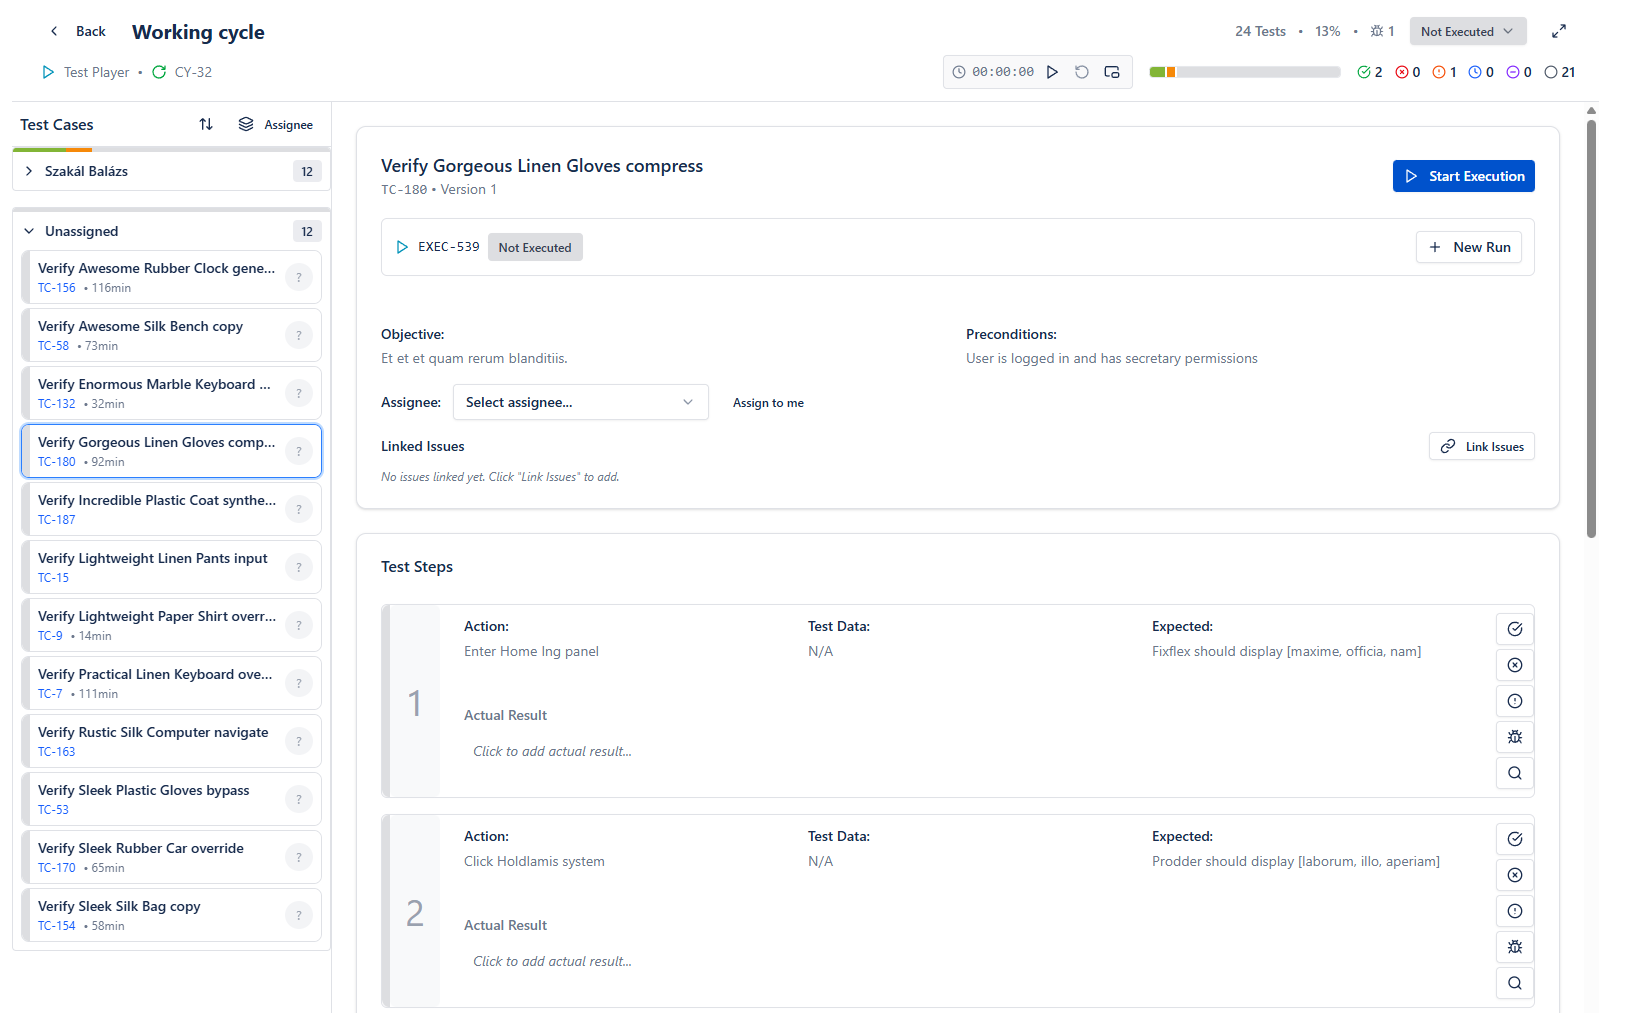
- 3Pick a test case on the left - or press Next to do (keyboard N) - and click "Start Execution". The test case is assigned to you and the timer starts.
The Test Player shows the test case description and preconditions, and each step with its test data and expected result. BDD test cases also show their Feature and Background.
Finding your next test in a big cycle
- •Search across keys, names and execution notes
- •My work shows only the test cases assigned to you
- •The filter panel narrows by status, has bugs, has a note, over time, tends to fail, retested or unassigned, with counts
- •Next to do jumps to the next open test; its menu lists the keyboard shortcuts
Executing Step by Step
For each step in the Test Player:
- 1Read the action and perform it in the application under test
- 2Compare the actual behavior with the expected result
- 3Record the outcome: mark the step Passed if they match, Failed if they don't, or Blocked if you can't execute it (environment down, missing data, failed dependency). Clicked the wrong one? Click it again to clear it.
- 4Add a note (optional but recommended) - note observations even for passing steps
- 5Create or link a Jira work item if you need to attach screenshots or other evidence
- 6Move to the next step
The test case result follows from the step results: a Failed or Blocked step finishes the run even if later steps were not run.
When a Step Fails
- 1Mark the step Failed
- 2Add a note describing what actually happened, how it differs from the expected result, and any error messages
- 3Create or link a Jira issue where you can attach screenshots showing the failure
- 4Decide whether to continue: keep testing if the remaining steps are independent; if the failure stops everything, you can leave the rest - the run already counts as finished and Failed
- 5Log a defect (covered in the next section)
When a Test Can't Run at All
Mark it Blocked and note why - environment down, missing test data, a failed prerequisite test, an unavailable integration. Blocked signals an impediment that needs resolution; Skipped means you decided not to run it. Keeping them distinct keeps your progress numbers honest.
Execution Habits That Pay Off
- •Test in order and complete one test case before starting another - partial executions are confusing
- •Watch for the "test case changed" banner: if someone edited the steps after the run was created, the Player tells you and lets you take the latest steps
- •Document specifics: "It worked" is not a useful comment; "Invoice total displayed as $1,247.50, matching the expected calculation" is
- •Check preconditions - don't carry state from a previous test
- •Don't rush - hurried testing misses defects
Want to feel the flow first? Click through a few steps in the interactive player below. More detail: Test Player - Execution.
Step 5: Log Defects from Failed Steps
When a test step fails, log the defect immediately - while the context is fresh and the evidence is in front of you.
When to Log (and When Not To)
Log a defect when the actual result differs from the expected result, the application errors or crashes, or a feature is missing. Do not log a defect when the test case itself is wrong (update the test case), the environment has a known issue (mark the test "Blocked"), or the expected behavior is ambiguous (discuss with the team first).
Creating a Defect from a Failed Test
- 1When a step fails in the Test Player, click the step's Create Work Item (bug) button
- 2BesTest opens the Jira create form as a Bug, pre-filled: a summary with the test case key and step, and a description with the cycle, test case, step action, test data, and the expected vs. actual result
- 3Review it and add the remaining details - the new bug is linked to the execution automatically:
| Field | What to Include |
|---|---|
| Summary | Sharpen the pre-filled title if needed: "Checkout - Tax calculation shows $0.00 for California addresses" |
| Priority/Severity | How critical is this? Does it block testing? |
| Attachments | Screenshots and logs, attached on the Jira issue |
| Environment | Browser, OS, test environment URL, test data used |
- 4Submit - the bug is created as a Jira work item in your Space
The Traceability Chain
When you create a defect from a failed test, BesTest maintains the complete chain:
Requirement → Test Case → Test Execution (Failed Step) → Jira BugYou can see all bugs discovered during a cycle, trace a bug back to the requirement it affects, and know exactly which test case to re-run when the fix lands.
A Bug Report Template That Works
Summary: [Area] - [What's wrong] - [Key detail]
Example: "Checkout - Tax calculation shows $0.00 for California addresses"

Steps to Reproduce:
1. Navigate to checkout with items in cart
2. Enter shipping address: 123 Main St, Los Angeles, CA 90001
3. Click "Calculate Total"

Expected: Tax displays as 9.5% of subtotal ($47.50 on $500.00)
Actual: Tax displays as $0.00

Environment: Chrome 120, staging.example.com
Test Data: User testbuyer@example.com, Order #TEST-789
Re-Testing After Fixes
When the fix is deployed to the test environment, start a New Run of the failed test case in the Test Player. If it passes, the bug is verified and closed; if not, it's reopened with updated information. Each run is kept, so the full history stays visible (reruns are listed in the test case selector).
Don't batch defect logging for later. "I'll log it after I finish the cycle" turns into vague or forgotten bugs. Details fade fast.
Step 6: Track Progress and Read the Results
As the cycle progresses, stakeholders will ask: "How's testing going? Can we release?" BesTest tracks everything in real time, so you can answer confidently.
Cycle Progress at a Glance
Open your test cycle to see the stats bar on its Overview: execution progress, pass rate, and results per status (Passed, Failed, Blocked, In Progress, Skipped, Not Executed). The Executions tab lists every run.
| Metric | Healthy Signal | Warning Signal |
|---|---|---|
| Completion % | Trending toward 100% by end date | Flat or declining (testers blocked or overloaded) |
| Pass rate | Above 85-90% | Below 70% (build quality issues) |
| Blocked tests | Under 5% | Above 10% (environment or dependency problems) |
| Open defects | Trending downward | Trending upward late in cycle |
Jira Dashboard Gadgets for Stakeholders
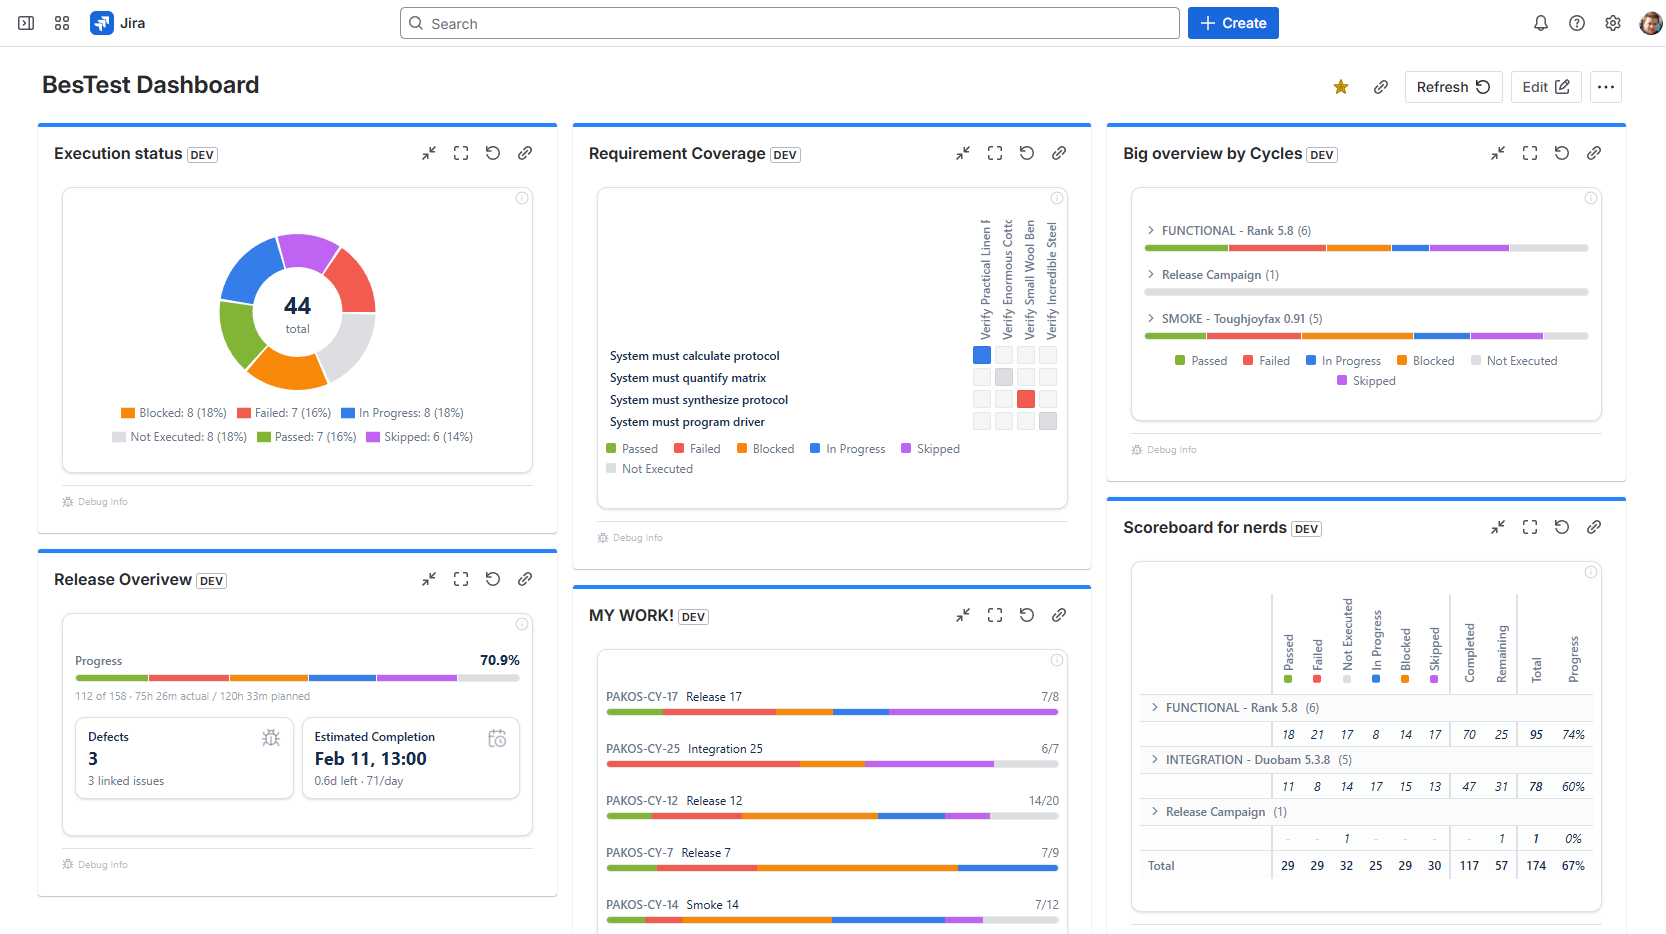
For people who don't open BesTest directly:
- 1Edit your Jira dashboard and add a BesTest gadget
- 2Pick a type - for example Execution Overview or Active Cycles
- 3Set its scope to your Space or cycle
Delivery managers and product owners now see testing progress right alongside their sprint board. See Jira Dashboard Gadgets.
Requirements Coverage: the "Can We Release?" View
Beyond cycle progress, BesTest maps results back to requirements:
- •Coverage: every requirement is Covered, Partly covered or Not covered, based on its significance (impact x complexity) and its linked test cases - or as decided by a person
- •Test Results: the Requirements catalog shows the latest executions of each requirement's test cases
- •Requirements Traceability Matrix report: per requirement, its test cases, latest results and linked bugs, with a High / Medium / Low risk level
If critical requirements are High risk or Not covered, the release decision is clear.
Reporting the Outcome
A cycle becomes Done when every run has a result. A Done cycle still accepts notes, linked defects and time spent; adding test cases or starting a New Run reopens it, and it closes again when everything has a result. You can also reopen or close it by hand from the banner on top. See Test Cycles.
Then pull the results together for stakeholders in Reports:
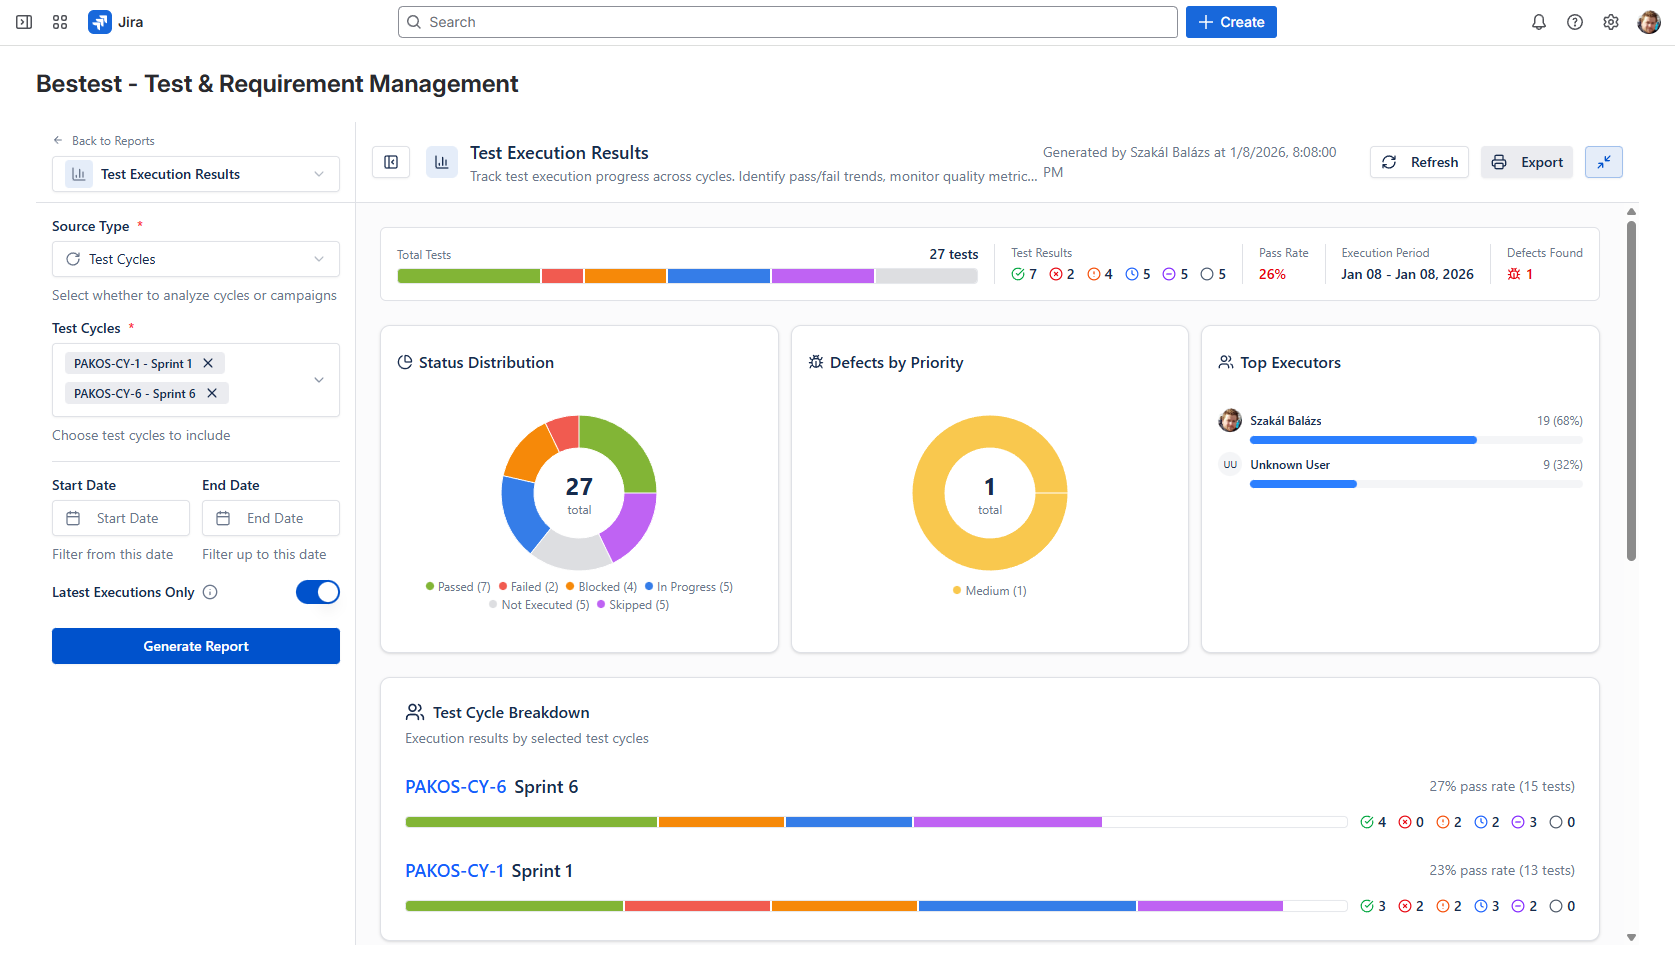
- •Test Execution Results: progress and defects for the cycle - "did we test what we planned, and did it pass?"
- •Requirements Traceability Matrix: coverage, results and risk per requirement - essential for release decisions and compliance evidence
- •Defect Analysis: defects created and resolved over time, so the team knows what's still open
- •Test Execution Results List: a printable list of every execution
Reports export to PDF. Share them in sprint reviews and release meetings, and use gadgets for real-time visibility.
For executive stakeholders, distill the report to one slide: total tests, pass rate, open critical defects, and a clear recommendation (go / no-go / conditional go). Keep the detail for those who want it.
Test Cycle Best Practices
After your first cycle, you'll quickly discover what works. These practices keep cycles efficient and valuable as you scale.
Keep Cycles Focused and Achievable
"Test everything" cycles never finish, multi-week cycles lose momentum, and overloaded cycles lead to rushed execution. Create multiple focused cycles instead - a "Sprint 7 Features" cycle plus a "Regression - Core Workflows" cycle beats one massive "Sprint 7 Everything" cycle.
Prioritize Execution Order
Run smoke tests first to catch build-breaking issues, then new feature tests (where most bugs live), then high-risk regression, then the rest. If time runs short, you've already covered the highest-risk areas.
Fix Forward, Don't Ignore Failures
Triage failures daily. Critical and major defects should be fixed and re-tested within the cycle; minor defects can be deferred to the next cycle with stakeholder agreement - but document every deferral and its rationale.
Re-Test Properly
After a fix, start a New Run of the failed test case - don't just mark it passed - and run related tests to check for regressions from the fix. Each run is kept, so the history stays intact.
Stay Consistent
Follow a naming convention ([Type] - [Release/Sprint] - [Scope]) and keep folders, priorities and custom fields consistent so Smart Collection rules work reliably. Document the conventions for new team members.
Run a 15-Minute Retrospective
After each cycle, ask: which tests caught real issues? What was painful - unclear tests, unstable environment, overloaded testers? How does this cycle compare with previous ones? Then fix one thing before the next cycle.
Keep Old Cycles
Old cycles are historical data: quality comparison across releases, audit evidence, recurring problem areas, and onboarding examples for new team members. Group them into folders by release to keep the catalog tidy.
Your first test cycle won't be perfect - and that's fine. The goal is to establish the workflow: create cycle, add tests, assign, execute, report. Each subsequent cycle gets smoother.
Frequently Asked Questions
How many test cases should be in a test cycle?
It depends on the cycle type and available time. Smoke test cycles typically have 10-20 critical-path tests. Sprint test cycles usually contain 20-50 tests covering new features and related regression. Full regression cycles can have 50-200+ tests. The key is to keep cycles achievable within your timeline. If a cycle is too large, split it into prioritized smaller cycles.
Can I reuse test cycles?
Each cycle is its own execution record, but you don't have to rebuild it. Clone a cycle from the Test Cycles catalog to get a new Draft cycle with the same test cases, or add the same Smart Collections to a fresh cycle. The history of the original cycle stays untouched.
How do Smart Collections help with test cycles?
Smart Collections are reusable sets of test cases built from rules (a filter on folder, priority, type, status or custom fields), requirements and hand-picked test cases. When creating a test cycle, you add a whole collection on the Collections tab instead of selecting tests one by one. For example, a "Regression Suite" collection with a folder rule on your Regression folder picks up every new test case filed there.
Can multiple testers work on the same cycle?
Yes - this is the standard approach for most test cycles. You assign different test cases to different testers within the same cycle. Each tester executes their assigned tests independently, and BesTest tracks who executed what, when, and with what result. The cycle progress dashboard shows the combined progress of all testers in real time.
How do I track test cycle progress?
The cycle's Overview shows execution progress, pass rate and results per status, updated as testers record results. For broader visibility, add BesTest gadgets to a Jira dashboard so stakeholders see progress without opening BesTest. The cycle assignee also gets an in-app notification when the cycle is finished.
Start Running Test Cycles Today
BesTest makes test cycle management simple with built-in execution, progress tracking, and reporting. Free for up to 10 users.
Try BesTest Free