
API tokens
Create your own token for the BesTest REST API and MCP server: pick its Space, access level and expiry, then rotate or revoke it. Space admins see and revoke every token aimed at their Space.
An API token is the single credential behind both the REST API and the MCP server. You create tokens yourself inside BesTest and can rotate or revoke them at any time. There is no request form and no waiting on us.
There are two screens, and which one you want depends on who you are:
| Screen | Where | What it is for |
|---|---|---|
| API & MCP tokens | The BesTest app menu (top right) | Your own tokens, across every Space. Create, rotate and revoke. |
| API / MCP | Space settings → Administration | Every token pointed at this Space, whoever owns it. Space admins revoke from here. |
Create a token
-
Open the app menu in the top right of BesTest and choose API & MCP tokens. The list shows every token you own, in every Space.
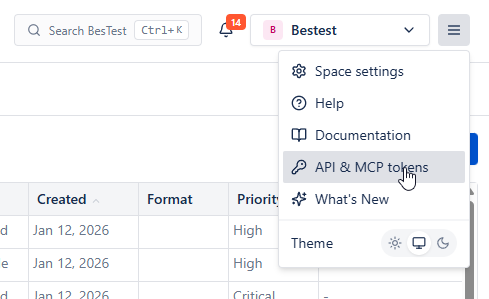
The BesTest app menu with API & MCP tokens highlighted -
Choose Create token, and fill in the four parts of the form:
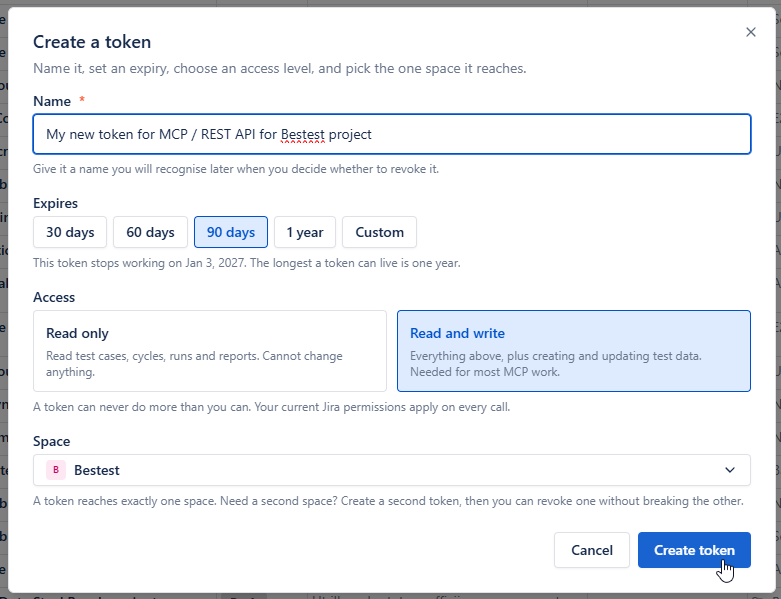
The Create a token dialog: name, expiry, access level and Space - Name (required). It is the only thing you will recognise the token by later, when you decide whether to revoke it, so name it after the job:
Claude DesktoporNightly Playwright uploadbeatsmy token. - Expires: 30, 60 or 90 days (the default), 1 year, or a custom date. Every token expires, the longest a token can live is one year, and there is no never-expires option. The dialog shows the exact date it will stop working.
- Access:
- Read only reads test cases, cycles, runs and reports, and cannot change anything. Right for dashboards, release gates and agents you only ask questions.
- Read and write adds creating and updating test data. Needed for pushing automated results, and for most MCP work where you want the agent to draft or edit things.
- Space: the one Space the token reaches. Need a second Space? Create a second token. That way you can revoke one without breaking the other.
- Name (required). It is the only thing you will recognise the token by later, when you decide whether to revoke it, so name it after the job:
-
Choose Create token.
A token can never do more than you can. Your own Jira and BesTest permissions still apply on every call, so a token belonging to someone who can only read a Space can only read it, whatever access level it was given. If you only have read access to a Space, BesTest only lets you create read-only tokens for it.
Copy the token now, because it is shown once
The moment a token is created, its full value is displayed with a Copy button. That is the only time you will see it. Close the dialog and the value is gone for good; the list only ever shows the token's name, never the secret.
The value is a long string that starts with eyJ. Copy all of it. If you lose it, you do not recover it: you rotate the token or create a new one.
A BesTest token is a bearer credential: whoever holds it can act as you, within that one Space and at that access level, until it expires or is revoked. Keep it in your CI secret store, your password manager, or an environment variable your agent reads, and keep it out of source control, screenshots and support tickets. If a token has leaked, revoke it first and ask questions afterwards.
Read a token's status
Both screens show a status worked out from the token's dates:
| Status | Meaning |
|---|---|
| Active | Working normally. |
| Expires in N days | Still working, but expiry is 30 days away or less. Time to plan a rotation. |
| Expired | Past its expiry date. Requests with it are refused. |
| Revoked | Deliberately switched off by its owner or a Space admin. Requests with it are refused, permanently. |
Revoked wins over everything else, so a token that was revoked and has since passed its expiry date still reads Revoked.
By default the lists show only live tokens. Turn on Show expired and revoked to see the dead ones as well: they stay as a record of what existed and who switched it off.
Rotate a token
Rotating swaps a token for a fresh one with the same name, access level, Space and expiry date. The new value is shown once, and the old value is revoked.
Rotate when someone who had the value has left, or when you suspect it has leaked.
The old value stops working as part of the rotation, so anything still using it breaks. Have the place you will paste the new value open (your CI secret, your agent's config) before you rotate, not after.
To rotate: open API & MCP tokens from the app menu, open the token's row menu, and choose Rotate. If the dialog warns that the old token could not be revoked, it is still live: revoke it by hand from the same menu.
Rotation keeps the original expiry date. To get a token that lives longer, create a new one and revoke the old one.
Revoke a token
Revoking is a permanent switch-off. The token is refused from then on and cannot be brought back; if you need access again, create a new token. The revoked row stays in the list, under Show expired and revoked, so you keep the audit trail.
As the owner: open API & MCP tokens from the app menu, open the token's row menu, and choose Revoke.
As a Space admin: open Space settings, then API / MCP under Administration. That screen lists every token pointed at the Space, whoever owns it, with its owner, name, access level, creation date, expiry, last use and status. Open the row menu on any live token and choose Revoke.
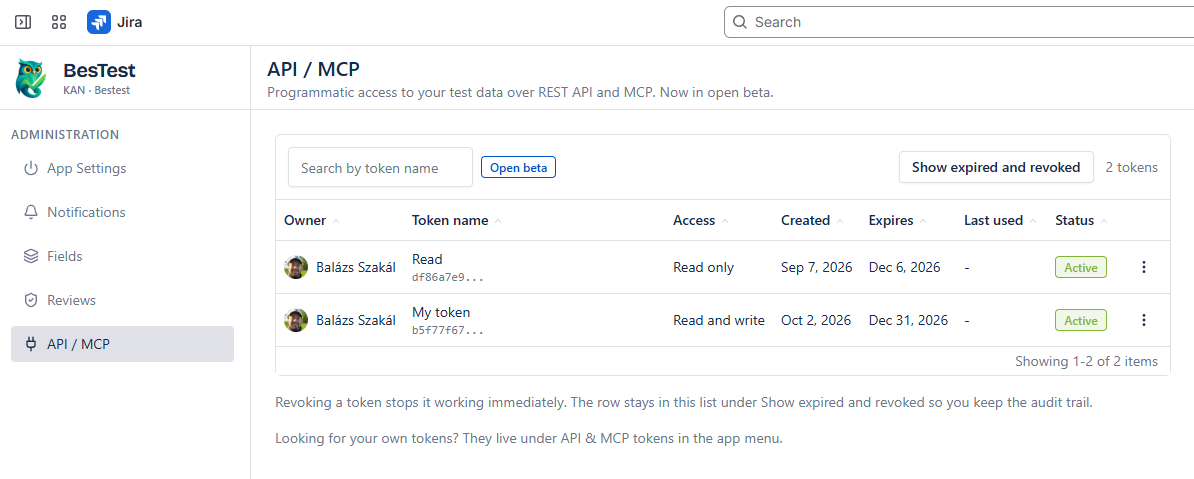
A Space admin can see and revoke every token aimed at their Space, and that is the whole of it. An admin cannot create a token for someone else, rotate one, or see its value. Revocation is a safety valve for someone leaving the team or a laptop going missing, not a way to take over someone's access.
Last used helps you spot tokens nobody needs any more. It is refreshed roughly once an hour, so a token used a minute ago can still show its previous time.
Use the token
Send it as a bearer token in the Authorization header, against your region's base URL:
export BESTEST_TOKEN="eyJ..."   # paste the whole value

curl "https://prod-eu.getbestest.com/api/v1/projects" \
  -H "Authorization: Bearer $BESTEST_TOKEN"
That call is a good first test: it returns the one Space your token reaches.
For an AI agent the same token goes in the client's config as an Authorization header. See Connect an MCP client.
When a request is refused
| Response | In rough order of likelihood |
|---|---|
403 Forbidden with Access denied. | Wrong region: a token only works against the server that issued it, so check the base URL against the region table. Or the token has expired, was pasted incompletely, or the header is malformed: it must read Authorization: Bearer <token>, one space, no quotes around the value. |
401 Unauthorized | The token has been revoked, by you, by a rotation, or by a Space admin. |
403 on a write only | The token is read only, or your own permissions do not allow that change. |
404 Not Found | The record exists, but not in the Space this token reaches. |
Related
- Overview - regions, permissions and rate limits
- Connect an MCP client - where the token goes in each agent
- REST API - what you can call with it